Here’s how I do it, the keys are getItemViewType and getViewTypeCount in the Adapter class. getViewTypeCount returns how many types of items we have in the list, in this case we have a header item and an event item, so two. getItemViewType should return what type of View we have at the input position.
Android will then take care of passing you the right type of View in convertView automatically.
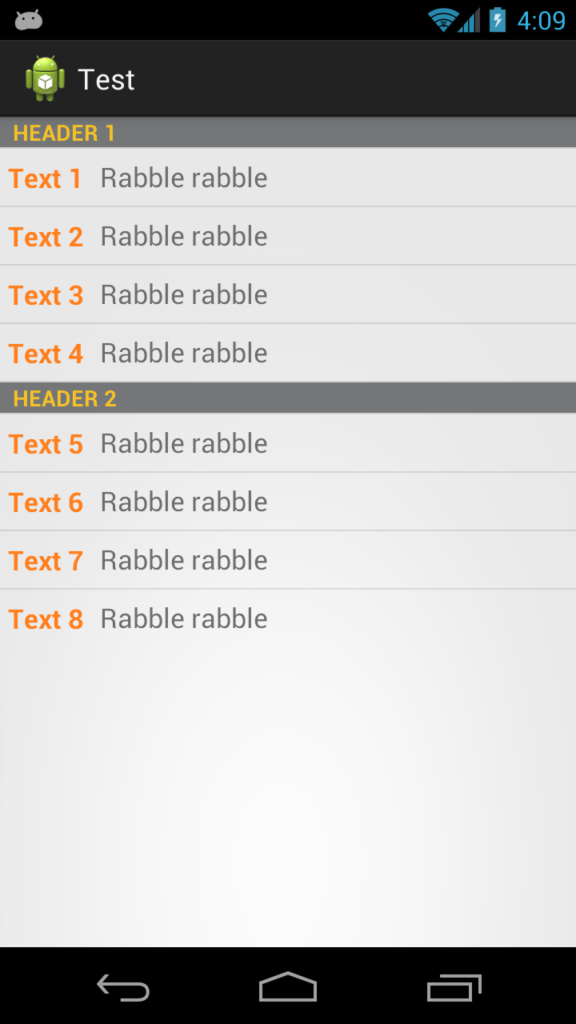
Here what the result of the code below looks like:
First we have an interface that our two list item types will implement
public interface Item {
    public int getViewType();
    public View getView(LayoutInflater inflater, View convertView);
}
Then we have an adapter that takes a list of Item
public class TwoTextArrayAdapter extends ArrayAdapter<Item> {
    private LayoutInflater mInflater;

    public enum RowType {
        LIST_ITEM, HEADER_ITEM
    }

    public TwoTextArrayAdapter(Context context, List<Item> items) {
        super(context, 0, items);
        mInflater = LayoutInflater.from(context);
    }

    @Override
    public int getViewTypeCount() {
        return RowType.values().length;

    }

    @Override
    public int getItemViewType(int position) {
        return getItem(position).getViewType();
    }
@Override
public View getView(int position, View convertView, ViewGroup parent) {
   return getItem(position).getView(mInflater, convertView);
}
EDIT Better For Performance.. can be noticed when scrolling
private static final int TYPE_ITEM = 0;
private static final int TYPE_SEPARATOR = 1;

public View getView(int position, View convertView, ViewGroup parent)  {
    ViewHolder holder = null;
    int rowType = getItemViewType(position);
    View View;
    if (convertView == null) {
        holder = new ViewHolder();
        switch (rowType) {
            case TYPE_ITEM:
                convertView = mInflater.inflate(R.layout.task_details_row, null);
                holder.View=getItem(position).getView(mInflater, convertView);
                break;
            case TYPE_SEPARATOR:
                convertView = mInflater.inflate(R.layout.task_detail_header, null);
                holder.View=getItem(position).getView(mInflater, convertView);
                break;
        }
        convertView.setTag(holder);
    }
    else
    {
        holder = (ViewHolder) convertView.getTag();
    }
    return convertView;
}

public static class ViewHolder {
    public  View View; }
}
Then we have classes the implement Item and inflate the correct layouts. In your case you’ll have something like a Header class and a ListItem class.
   public class Header implements Item {
    private final String         name;

    public Header(String name) {
        this.name = name;
    }

    @Override
    public int getViewType() {
        return RowType.HEADER_ITEM.ordinal();
    }

    @Override
    public View getView(LayoutInflater inflater, View convertView) {
        View view;
        if (convertView == null) {
            view = (View) inflater.inflate(R.layout.header, null);
            // Do some initialization
        } else {
            view = convertView;
        }

        TextView text = (TextView) view.findViewById(R.id.separator);
        text.setText(name);

        return view;
    }

}
And then the ListItem class
    public class ListItem implements Item {
    private final String         str1;
    private final String         str2;

    public ListItem(String text1, String text2) {
        this.str1 = text1;
        this.str2 = text2;
    }

    @Override
    public int getViewType() {
        return RowType.LIST_ITEM.ordinal();
    }

    @Override
    public View getView(LayoutInflater inflater, View convertView) {
        View view;
        if (convertView == null) {
            view = (View) inflater.inflate(R.layout.my_list_item, null);
            // Do some initialization
        } else {
            view = convertView;
        }

        TextView text1 = (TextView) view.findViewById(R.id.list_content1);
        TextView text2 = (TextView) view.findViewById(R.id.list_content2);
        text1.setText(str1);
        text2.setText(str2);

        return view;
    }

}
And a simple Activity to display it
public class MainActivity extends ListActivity {

    @Override
    protected void onCreate(Bundle savedInstanceState) {
        super.onCreate(savedInstanceState);
        setContentView(R.layout.activity_main);

        List<Item> items = new ArrayList<Item>();
        items.add(new Header("Header 1"));
        items.add(new ListItem("Text 1", "Rabble rabble"));
        items.add(new ListItem("Text 2", "Rabble rabble"));
        items.add(new ListItem("Text 3", "Rabble rabble"));
        items.add(new ListItem("Text 4", "Rabble rabble"));
        items.add(new Header("Header 2"));
        items.add(new ListItem("Text 5", "Rabble rabble"));
        items.add(new ListItem("Text 6", "Rabble rabble"));
        items.add(new ListItem("Text 7", "Rabble rabble"));
        items.add(new ListItem("Text 8", "Rabble rabble"));

        TwoTextArrayAdapter adapter = new TwoTextArrayAdapter(this, items);
        setListAdapter(adapter);
    }

}
Layout for R.layout.header
<?xml version="1.0" encoding="utf-8"?>
<LinearLayout xmlns:android="http://schemas.android.com/apk/res/android"
    android:layout_width="match_parent"
    android:layout_height="match_parent"
    android:orientation="horizontal" >

    <TextView
        style="?android:attr/listSeparatorTextViewStyle"
        android:id="@+id/separator"
        android:text="Header"
        android:layout_width="fill_parent"
        android:layout_height="wrap_content"
        android:background="#757678"
        android:textColor="#f5c227" />

</LinearLayout>
Layout for R.layout.my_list_item
<?xml version="1.0" encoding="utf-8"?>
<LinearLayout xmlns:android="http://schemas.android.com/apk/res/android"
    android:layout_width="match_parent"
    android:layout_height="match_parent"
    android:orientation="horizontal" >

    <TextView
        android:id="@+id/list_content1"
        android:layout_width="wrap_content"
        android:layout_height="match_parent"
        android:layout_margin="5dip"
        android:clickable="false"
        android:gravity="center"
        android:longClickable="false"
        android:paddingBottom="1dip"
        android:paddingTop="1dip"
        android:text="sample"
        android:textColor="#ff7f1d"
        android:textSize="17dip"
        android:textStyle="bold" />

    <TextView
        android:id="@+id/list_content2"
        android:layout_width="wrap_content"
        android:layout_height="match_parent"
        android:layout_margin="5dip"
        android:clickable="false"
        android:gravity="center"
        android:linksClickable="false"
        android:longClickable="false"
        android:paddingBottom="1dip"
        android:paddingTop="1dip"
        android:text="sample"
        android:textColor="#6d6d6d"
        android:textSize="17dip" />

</LinearLayout>
Layout for R.layout.activity_main.xml
<RelativeLayout xmlns:android="http://schemas.android.com/apk/res/android"
    xmlns:tools="http://schemas.android.com/tools"
    android:layout_width="match_parent"
    android:layout_height="match_parent"
    tools:context=".MainActivity" >

    <ListView
        android:id="@android:id/list"
        android:layout_width="fill_parent"
        android:layout_height="fill_parent" />

</RelativeLayout>
You can also get fancier and use ViewHolders, load stuff asynchronously, or whatever you like.